If you havent considered an induction cooktop, its time to start thinking about one. Induction cooktops operate by creating an electromagnetic field to transfer energy directly to your cookware. When you place a magnetic pan onto an induction cooktop, it creates heat for the pan and the pan alone while everything around it stays cool. This technology comes with a wide variety of advantages. Not only are induction cooktops quicker to heat your pans than gas or electric alternatives, but theyre also quicker to cool and way easier to clean, thanks to their flat design. Induction cooktops also tend to be more environmentally friendly than some other styles of cooking.
With these positives, though, come negatives — and one major downside is that induction cooktops are more likely to be misused. Although theyre pretty easy to operate, peoples unfamiliarity with induction technology can lead to them making simple but crucial mistakes like buying the wrong pans, using incorrect heat settings, or placing their cookware on the stove poorly. Its also easy to forget that not all foods cook the same on induction cooktops, and neglecting to change your recipes can ruin your meal. Were here to help you avoid these errors and use your induction cooktop with style.
Hey there bacon lovers! If you’ve got an induction cooktop and you’re itching to whip up some perfectly crispy mouthwatering bacon, you’re in the right spot. I’m gonna walk ya through every step of how to cook bacon on an induction cooktop, and trust me, once you nail this, you’ll be the breakfast hero of your house. Induction cooking can feel a bit funky at first—heck, I burned my fair share of strips before I got the hang of it—but with a few tricks up your sleeve, it’s a game-changer for getting that sizzly goodness just right.
Induction cooktops are slick, fast and energy-efficient but they play by different rules compared to gas or electric stoves. They use electromagnetic magic to heat your pan directly, which means you gotta have the right gear and tweak your approach. No worries, though; I’ve got your back with a no-nonsense guide to make your bacon dreams come true. Let’s dive straight into the good stuff—how to make it happen, step by step.
Why Induction Cooktops Are a Bacon Game-Changer
Before we get to the nitty-gritty, lemme tell ya why cooking bacon on an induction cooktop is kinda awesome These bad boys heat up quicker than you can say “breakfast,” and they give you pinpoint control over the temp That means less chance of scorching your precious bacon strips. Plus, the smooth glass surface don’t trap grease like old-school coils do, so cleanup ain’t a nightmare. And get this—since the heat goes straight to the pan, you’re not wasting energy warming up your whole kitchen. Pretty sweet, right?
But here’s the catch: induction can be a bit of a diva. It heats crazy fast, so if you crank it too high, you’ll have charred bacon before you even blink. And not just any pan will do—you need the right kind. Stick with me, and I’ll show ya how to work around these quirks for bacon that’s crispy, golden, and downright irresistible.
Step 1: Grab the Right Cookware for Induction
First things first, you can’t just use any old skillet on an induction cooktop. These fancy stoves only vibe with pans that got a magnetic bottom. If your pan ain’t got that, it’s like trying to charge your phone with a potato—ain’t gonna happen. So, here’s what to look for when picking your bacon-cooking weapon of choice.
- Cast Iron Skillets: These are my go-to. They’re heavy, heat up nice and even, and hold that heat like a champ. Perfect for avoiding hot spots that can burn your bacon to a crisp.
- Stainless Steel with Magnetic Base: Another solid pick. Just make sure the bottom is magnetic—flip it over and stick a fridge magnet to it. If it sticks, you’re golden.
- Size Matters: Go for a 10 or 12-inch skillet. Big enough to cook 6-8 strips without crowding, but not so huge it don’t heat evenly.
- Low or Straight Sides: High sides make flipping bacon a pain. Keep it shallow so you can get in there easy.
- Avoid Junk: Don’t even think about aluminum or copper pans. They won’t work on induction, no matter how pretty they look.
Here’s a quick lil’ table to break down your cookware options:
| Pan Type | Works on Induction? | Pros | Cons |
|---|---|---|---|
| Cast Iron Skillet | Yes | Even heat, durable, no hot spots | Heavy, needs seasoning |
| Stainless Steel (Magnetic) | Yes | Lightweight, easy to clean | Can have uneven heat if cheap |
| Aluminum/Copper | No | – | Won’t heat at all |
| Non-Magnetic Stainless | No | – | No dice on induction |
Pro tip from yours truly: If you ain’t sure about your pan, do the magnet test before you start. Saves ya a lotta frustration. I learned that the hard way when I tried using my fave aluminum frying pan and stood there wondering why it wasn’t getting hot. Doh!
Step 2: Preheat That Pan Like a Boss
Alright, now that you’ve got the right skillet, don’t just slap the bacon in there cold. Preheating is key to getting that fat to render nice and slow, so your bacon don’t stick like glue. Trust me, I’ve peeled enough stuck-on strips off a pan to know this ain’t optional.
Set your induction cooktop to medium heat—somewhere around 325°F to 350°F if yours got a temp setting. Let that pan warm up for 2-3 minutes. If you’ve got one of them fancy infrared thermometers, check the temp to make sure it’s in that sweet spot. No thermometer? No biggie. Just hover your hand a few inches above the pan—if it feels hot without burning ya, it’s ready.
Why preheat? ‘Cause a cold pan means your bacon sticks, and you’ll be scraping bits off instead of eating ‘em. Plus, induction heats so dang quick, you don’t wanna start too hot or you’ll char the outside before the inside even cooks. Been there, done that, and it ain’t pretty.
Step 3: Lay Down the Bacon and Keep It Chill
Pop that bacon in the pan, but don’t go overcrowding it like a clown car. Lay the strips in a single layer with a lil’ space between each one. If you pile ‘em up, they’ll steam instead of fry, and you’ll end up with sad, limp bacon. Nobody wants that mess.
If you’ve got a big batch to cook, do it in rounds. Maybe 3-4 strips at a time, depending on your pan size. I usually cook for me and my crew, so I do two or three batches to keep things crispy. Patience pays off here, fam.
Also, if you’re using thick-cut bacon, you might wanna slice ‘em in half horizontally so they cook more even. Thin slices? Leave ‘em as is. And hey, if you wanna get fancy, sprinkle a pinch of black pepper or a drizzle of maple syrup on there before cooking. Just don’t overdo sugary stuff—it burns quick on induction.
Step 4: Cook Low and Slow for Perfect Crisp
Here’s where induction can trip ya up if you’re not careful. These cooktops heat up faster than a hot rod, so resist the urge to crank it to high. Set it to medium-low, around 300°F to 325°F, for the best results. High heat will scorch your bacon before the fat even renders proper.
For thick-cut bacon, give it about 5 minutes per side till it’s golden brown and sizzly. Thinner stuff might only need 2-3 minutes a side. Flip ‘em every couple minutes with tongs—not a fork, ‘cause you don’t wanna poke holes and lose them juices. If you notice the fat rendering out before it browns, dial the heat down a notch. Low and slow beats burnt and bitter any day.
Another trick I picked up: If your cooktop has small induction zones, use ‘em instead of one big zone. They focus the heat better, keeping things nice and even. I’ve got a Wolf induction at home, and using the smaller zones saved my bacon—literally.
Step 5: Drain That Grease Like a Pro
As your bacon cooks, you’ll see a lotta fat render out. Don’t let it pool up in the pan, or your strips will just swim in grease and lose that crisp. Grab some tongs and move the cooked bacon to a plate lined with paper towels. Them towels soak up the extra grease like magic.
Or, if you wanna be extra, set up a cooling rack over a baking sheet and lay the bacon there. It lets air flow around, draining fat even better. Either way, pour off the excess grease from the pan between batches—careful though, that stuff is hot as heck. Don’t dump it down the drain neither; let it cool in a can or jar before tossing it. I’ve clogged a sink or two in my day, and it ain’t fun.
Step 6: Crisp It Up If You’re Feelin’ Fancy
If your bacon’s lookin’ good but you want that extra crunch, you got options. One, turn up the heat on the cooktop for the last minute or two—just watch it close so it don’t burn. Or, pop the cooked strips on a baking sheet and throw ‘em in a 400°F oven for 5 minutes. That oven trick works wonders for getting it super crispy without overdoing it on the stove.
I usually do the stovetop method ‘cause I’m impatient, but if I’m cooking for a crowd, the oven’s my secret weapon. Gives me time to whip up some eggs while the bacon finishes.
Troubleshooting: Fix Them Bacon Blunders
Even with induction’s fancy tech, things can go sideways. Here’s how to handle the usual suspects when cooking bacon. I’ve messed up plenty, so learn from my goof-ups.
- Bacon Curling Up Like Crazy: Flatten it out before cooking. Lay the strips between paper towels and press ‘em down a bit. Keeps ‘em from shriveling in the pan.
- Sticking to the Pan: If it’s glued down, you probably didn’t preheat enough. Let the pan get hot before adding bacon, and don’t nudge it too soon. Once the fat renders, it’ll release natural-like.
- Uneven Cooking: Make sure your pan’s flat on the cooktop for full contact. If it’s warped, heat won’t spread right. Also, cut thick bacon in half for even results.
- Grease Splatters Everywhere: Use a skillet with taller sides to trap the mess. Pour off grease as it builds up, and don’t overcrowd. I’ve got a scar or two from hot grease—don’t be me.
Cleanup: Induction Makes It a Breeze
One thing I love about induction cooktops is how easy they are to clean after a bacon sesh. Since there’s no coils or burners, grease don’t get stuck in weird nooks. Once the surface cools a tad, just wipe it down with a damp paper towel. If there’s stubborn bits, a lil’ warm soapy water does the trick. Don’t use harsh scrubby stuff though—it’ll scratch that pretty glass top.
I usually clean right after cooking while the grease is still warm (but not hot enough to burn me). Takes two minutes, and my kitchen don’t look like a war zone. Way better than wrestling with a gas stove, lemme tell ya.
Safety First: Don’t Get Burned
Cooking bacon ain’t without risks, especially with hot grease flying around. Here’s how to keep yourself safe on an induction cooktop:
- Wear short sleeves so they don’t catch on a hot pan handle. I’ve singed a shirt before—lesson learned.
- Use tongs or a spatula for flipping, not forks. Keeps your hands outta the danger zone.
- Don’t overcrowd the pan. More bacon means more splatter, and that’s a recipe for ouch.
- Keep kiddos and pets away from the cooktop while you’re frying. That glass might not look hot, but the pan sure is.
- Let grease cool completely before dumping it. Hot grease plus skin equals bad news.
If you’re nervous about splatters, toss a splatter screen over the pan or cook in the oven instead. Safety ain’t sexy, but it’s smarter than a trip to the ER.
Serving Ideas: Bacon Beyond Breakfast
Now that you’ve got perfectly cooked bacon, whatcha gonna do with it? Sure, it’s great with eggs and toast, but let’s get creative. Here are some ideas me and my fam love:
- BLT Sammies: Stack that bacon with lettuce, tomato, and mayo on some crusty bread. Lunch heaven.
- Bacon Omelet: Crumble it into a fluffy omelet with some cheese. I like goat cheese for a lil’ tang.
- Salad Topper: Sprinkle bacon bits over a Cobb salad or even just plain greens. Adds crunch and flavor.
- Burger Upgrade: Slap a few strips on a cheeseburger. Takes it from meh to whoa.
- Sweet and Savory: Wrap bacon around dates and bake ‘em for a quick appetizer. Sounds weird, tastes amazing.
And sometimes, I just snack on a strip straight from the pan. Don’t judge—ya know you’ve done it too.
Storing Leftover Bacon (If There Is Any)
If by some miracle you’ve got leftover bacon, store it right so it don’t go to waste. Let it cool down completely first, then pop the strips in a zip-top bag with a paper towel to soak up grease. It’ll keep in the fridge for about 5 days, no prob.
Wanna save it longer? Freeze it! Lay the slices flat on a parchment-lined baking sheet till they’re solid, then transfer to a freezer bag. Keeps good for 2-3 months. When you’re ready to eat, reheat in the oven at 400°F for 5-10 minutes till it’s sizzling again. Don’t microwave it unless you like rubbery bacon—yuck.
I usually freeze a batch ‘cause my kids devour it faster than I can cook. Reheating in the oven brings back that fresh-cooked vibe, and we’re all happy campers.
Why You’ll Never Go Back to Regular Stoves
Once you master cooking bacon on an induction cooktop, you might never wanna mess with gas or electric again. The speed, the control, the easy cleanup—it’s like having a cheat code for breakfast. Yeah, there’s a learning curve, and you gotta get used to how quick it heats, but the payoff is worth it. Crispy bacon without the fuss? Sign me up.
I remember the first time I got it right on my induction top. Felt like I’d cracked some ancient code. My kitchen smelled like heaven, and the bacon was just the right kinda crunchy. Now, I’m hooked, and I bet you will be too.
Extra Tips for Bacon Perfection
Before I let ya go, here’s a few more nuggets of wisdom I’ve picked up over countless bacon batches:
- Pat It Dry: Before cooking, blot the bacon with paper towels to get rid of extra moisture. Helps it crisp up nicer.
- Small Batches Rule: Don’t rush it by cramming the pan. Small batches mean better results, even if it takes longer.
- Save the Grease: Strain that rendered fat into a jar if you wanna reuse it. It’s gold for frying eggs or potatoes later.
- Experiment a Lil’: Try different bacon cuts—thick, thin, applewood-smoked. Each one cooks a bit different, so play around.
- Watch the Heat: Induction can vary by brand, so get to know yours. Some run hotter even on medium, so adjust as ya go.
I’ve had my share of bacon flops—burnt edges, soggy centers, you name it. But messing up taught me what works. Keep at it, and you’ll be slingin’ perfect strips in no time.
Wrapping It Up: Your Bacon Journey Awaits
So there ya have it, folks—a full-on guide to cooking bacon on an induction cooktop like a total pro. From picking the right pan to flipping at the perfect moment, you’ve got all the tools to make breakfast magic. Induction might seem intimidating at first, but with a lil’ practice, it’s gonna be your best kitchen buddy.
Next time you’re craving that savory, crispy goodness, fire up that cooktop and give these steps a whirl. I’m betting you’ll be amazed at how easy and tasty it turns out. And hey, if ya got any wild bacon hacks or stories of your own, drop ‘em in the comments. I’m always down to learn a new trick or two. Now, go get sizzlin’—your bacon ain’t gonna cook itself!

Ignoring your safety lights
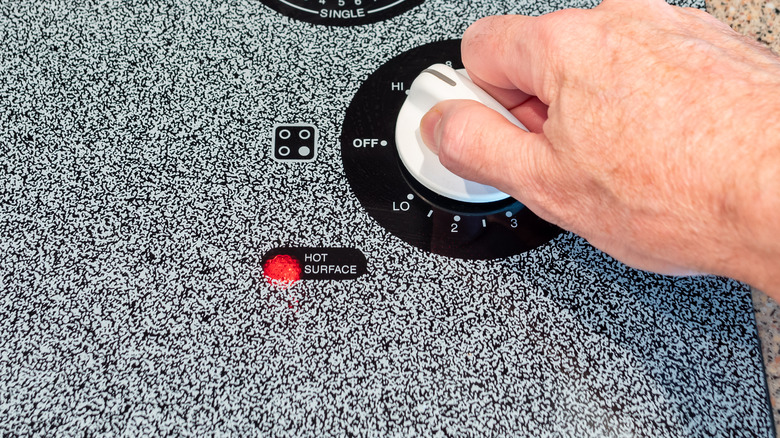
Induction cooktops come equipped with safety lights for a reason, and that reason is — you guessed it — to keep you safe. Many induction cooktops have a safety indicator that shows you when the surface is still hot. Sometimes, this is pretty clear, with the word “HOT” illuminating to indicate that things are still an unsafe temperature. Other times, it may show up as a red triangle or even just a simple light. These lights are particularly important to pay attention to, as induction cooktop cooking zones tend not to light up when theyre in operation as they do on electric cooktops, which gives you a clear visual indicator that they shouldnt be touched.
Some induction cooktops also come with a child lock function that can be indicated by an illuminated key shape or, again, a single light. If theres any uncertainty about which light means what on your appliance, make sure to refer to your instruction manual. You should also pay close attention to whether these lights are coming on when theyre meant to. If your heat indicator light doesnt illuminate when your cooktop is still hot, it could mean that your appliance needs a factory reset or has started to malfunction.
Allowing spills to sit for too long
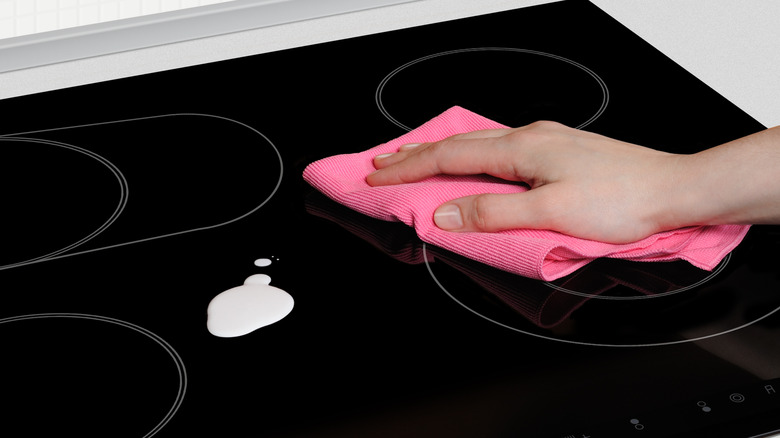
One of the best things about induction cooktops is their flatness, making cleaning spills as simple as wiping them away. Dont be tempted to leave spills for too long, though, as they can get in the way of your cooking. “Sugary spills can stick to the glass and create an uneven surface on your glass cooktop,” explains Choice kitchen expert Fiona Mair. These can be almost imperceptible and wont create an obvious barrier between your pan and your cooktop or burn onto it like they would when using a gas or electric stove. They may, however, stop your pan from heating effectively and can become harder to clean off over time.
Importantly, this isnt just an issue for your pans connection to your cooktop. Mair points out that spills or splatters can also end up on your touch controls, making it hard to turn the heat up, down, or off. You should always keep your touch controls clean when cooking and wipe any spills off as soon as they occur. For spills that end up directly in your cooking zone, its usually best to wait until youve finished cooking and your cooktop is cool before wiping it off, as long as its not getting in the way.
cooking bacon on induction stove
FAQ
What cannot be cooked on an induction stove?
Aluminum or aluminum clad, copper or copper clad, aluminum foil, glass/ceramic and some stainless steel products (because these will not attract and hold a magnet) cannot be used.
What happens if you use the wrong pan on an induction cooktop?

If you use a pan that’s not compatible with induction cooking on an induction cooktop, the burner simply won’t turn on, and the pan won’t heat up.
How to cook with stainless steel on an induction cooktop?
Induction stovetops can heat up quickly, so it’s important to monitor the heat when cooking with stainless steel cookware. Keep an eye on the temperature dial and adjust the heat as needed to prevent food from burning or boiling over. Triply cookware will quickly heat up, so always watch over the temperature level.
Can you cook on an induction cooktop?
Since induction cooking technology using the electromagnetic system, it needs to have suitable cookware to function. So when cooking on an induction cooktop, you need to use cast iron or certain stainless steel materials. Aluminum, glass, and glass cookware will simply not be effective.
What is Bacon induction?
Baconian induction means ascending from sense experience to axioms, as well as descending to works, such that new particulars and axioms are obtained from previous axioms. From the general axioms, Bacon tries to reach fundamental laws of nature (knowing the forms), which in turn lead to practical deductions as new works or experiments.
How effective is Bacon’s induction method?
For Bacon, induction is effective only if it is able to eliminate by exclusion the negative instances of the path to discovery. This focus on negativity for the procedure itself is an innovative element and some historians have seen in Francis Bacon a forerunner of Karl Popper with regard to the method of falsification.
What is the best temperature to cook Bacon at?
Chefs recommend cooking bacon at 400 degrees F (205 degrees C). For an extra crispy result, you can try increasing the oven heat to 425 degrees F (220 degrees C) for the final 5 minutes of cooking time.
What happens if you cook bacon too high?
Cooking bacon at too high a temperature will cause it to curl and lose contact with the pan, according to chef John Somerville. This can lead to uneven cooking and burning. He also notes that high heat will ‘burn the bacon before it has a chance to render and cook’.
How do you cook bacon in a sheet pan?
Preheat the oven to 400 degrees F (205 degrees C). Then, place the bacon on a sheet pan and cook until crispy. This is the ultimate way to cook bacon, according to chefs.